Hi all,
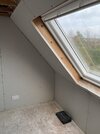
I've almost finished boarding out an attic room (using insulated plasterboard; just a few bits left such as the velux reveals and boarding the ceiling) so next step will be the finishing. The plasterboard is tape and joint/tapered edge and I have a variety of different anges where the boards join and was hoping to get a bit of advice.
For external corners e.g. edges of window reveals, should I be using the metal beading strips, such as this and then just taper off the plaster skim as I work away from the edge?
https://www.screwfix.com/p/simpson-...in-coat-angle-bead-2-3mm-x-2-4m-10-pack/55587
For the other obtuse angled joints I was thinking of using this...
https://www.screwfix.com/p/diall-reinforced-corner-jointing-tape-white-30m-x-50mm/981cf
Between the boards themselves the flat joins I was just going to use normal jointing tape. Does this sound about right? I've added a photo of a section of the room which hopefully helps explain what I have in terms of corners etc.


