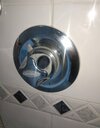
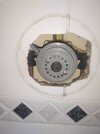
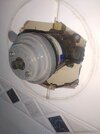
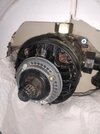
I have had three Aqualisa showers in our house for many years and have found that there is a lack of information/advice on servicing the cartridge part number 022801 and the other similar cartridges. However, having tackled several cartridges my experience is documented below.
There are three common leaks associated with the cartridge:-
1) You cannot stop the showerhead dripping
2) There is a drip from the front of valve behind the temperature control ring
3) There is a leak between the valve body and the cartridge itself.
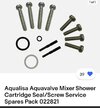
Aqualisa will only supply the two seals that are required when a new cartridge is fitted. These are the o ring at the back of the valve where the hot water enters and the bespoke seal/gasket between the cartridge and the body of the shower valve.
If the later fails (unusual in my experience) you get leak 3)
If the hot water o ring fails you get leak 1). Unfortunately, there are also other reasons why leak 1) may occur.
In addition to the items you can purchase from Aqualisa there are many seal kits available on the web. Before investing in any of these please check out the following:-
1) There is a good technical reason why Aqualisa do not supply a seal kit. These cartridges do wear out over a period of time and replacing the internal o rings will not solve many cases of leaks 1) or 2).
2) Some of the o ring sets do not contain the correct size o rings – these are obviously useless – read the reviews.
3) Other kits talk about the internal seal that cannot be replaced. In plain English this means that the cartridge may be worn to the extent that replacing the o rings will not provide a complete cure, although they may reduce any leak.
4) If you have the time and patience and want to have a go with the nitrile seals my experience is as follows:-
6) To dismantle the cartridge:-
8) A couple of other tips are:-
9) If all this fails there is always a new cartridge!!!
Generally these are good reliable and efficient cartridges compared with others I have experienced.
I hope this helps someone – it would certainly have helped me at the start of my Aqualisa journey!!!
There are three common leaks associated with the cartridge:-
1) You cannot stop the showerhead dripping
2) There is a drip from the front of valve behind the temperature control ring
3) There is a leak between the valve body and the cartridge itself.
Aqualisa will only supply the two seals that are required when a new cartridge is fitted. These are the o ring at the back of the valve where the hot water enters and the bespoke seal/gasket between the cartridge and the body of the shower valve.
If the later fails (unusual in my experience) you get leak 3)
If the hot water o ring fails you get leak 1). Unfortunately, there are also other reasons why leak 1) may occur.
In addition to the items you can purchase from Aqualisa there are many seal kits available on the web. Before investing in any of these please check out the following:-
1) There is a good technical reason why Aqualisa do not supply a seal kit. These cartridges do wear out over a period of time and replacing the internal o rings will not solve many cases of leaks 1) or 2).
2) Some of the o ring sets do not contain the correct size o rings – these are obviously useless – read the reviews.
3) Other kits talk about the internal seal that cannot be replaced. In plain English this means that the cartridge may be worn to the extent that replacing the o rings will not provide a complete cure, although they may reduce any leak.
4) If you have the time and patience and want to have a go with the nitrile seals my experience is as follows:-
a. For leak 1) try replacing just the hot water o ring at the back of the valve. The size of this is Internal Diameter 14mm with a Cross Section of 2.5mm. This will cost around one pound.
b. If you do not have leak 3) and are careful you should be able to clean up and reuse the body gasket. (if you do have leak 3 you will probably need a new gasket either from Aqualisa direct or those on the web will almost certainly be Aqualisa supplied items)
c. If you still have a leak and want to replace the spindle o rings I have successfully used:-
5) The precise instructions to gain access to the cartridge vary a little from model to model and are widely available on the web or by contacting Aqualisa.b. If you do not have leak 3) and are careful you should be able to clean up and reuse the body gasket. (if you do have leak 3 you will probably need a new gasket either from Aqualisa direct or those on the web will almost certainly be Aqualisa supplied items)
c. If you still have a leak and want to replace the spindle o rings I have successfully used:-
1 x ID 6mm x CS 2.5mm – nearest back
1 x ID 9mm x CS 1.5mm – the middle
1 x ID 8mm x CS 2.5mm – nearest front
1 x ID 14mm x CS 2.5mm – spindle cap o ring (same as for a. above)
d. These o rings can be purchased individually from various sources on Ebay for around a fiver in total.1 x ID 9mm x CS 1.5mm – the middle
1 x ID 8mm x CS 2.5mm – nearest front
1 x ID 14mm x CS 2.5mm – spindle cap o ring (same as for a. above)
6) To dismantle the cartridge:-
a. Remove the lugged cap nut on the front of the cartridge. Use either long nose pliers or using great care, mole grips. It can be quite tight.
b. Note very carefully the position of the white washer and how it sits flush with its housing. Take a photo with the white washer on and also with the white washer removed.
c. Pull the shaft from the body again using great care. It can be tight since the internal o rings provide quite strong resistance. Putting the splined on/off knob back on and turning a little can help release the first o ring.
d. Carefully remove and replace the 4 o rings. 3 on the shaft and one on the screw cap. Silicone grease should be used – buy a tube if necessary for a couple of pounds – it is always useful to have.
e. When you reassemble it is essential to realise that there are two raised guides in the housing which must line up with the two small indents in the shaft collar just below the screw. These must locate first and the spindle will push in until there is a further resistance before the spindle is fully located. If the location is not correct pull the spindle out and start again. The final push can quite tight to overcome the resistance of the new cap o ring. It must push completely home before the cap nut is replaced. Use the photos at step b) to check. Replace the white washer and replace the cap using little more than hand tightness. The tightness of this cap is not part of the water seal – too much pressure will break the cap.
7) Replace the cartridge and test for leaks before putting everything back together.b. Note very carefully the position of the white washer and how it sits flush with its housing. Take a photo with the white washer on and also with the white washer removed.
c. Pull the shaft from the body again using great care. It can be tight since the internal o rings provide quite strong resistance. Putting the splined on/off knob back on and turning a little can help release the first o ring.
d. Carefully remove and replace the 4 o rings. 3 on the shaft and one on the screw cap. Silicone grease should be used – buy a tube if necessary for a couple of pounds – it is always useful to have.
e. When you reassemble it is essential to realise that there are two raised guides in the housing which must line up with the two small indents in the shaft collar just below the screw. These must locate first and the spindle will push in until there is a further resistance before the spindle is fully located. If the location is not correct pull the spindle out and start again. The final push can quite tight to overcome the resistance of the new cap o ring. It must push completely home before the cap nut is replaced. Use the photos at step b) to check. Replace the white washer and replace the cap using little more than hand tightness. The tightness of this cap is not part of the water seal – too much pressure will break the cap.
8) A couple of other tips are:-
a. It is possible to replace the shaft seals without removing the cartridge.
b. Where the cartridge is worn, a constant drip from the shower head or front of the cartridge, whilst turned off, can be sometimes be eliminated or reduced by turning the temperature control to the fully cold position when not in use.
b. Where the cartridge is worn, a constant drip from the shower head or front of the cartridge, whilst turned off, can be sometimes be eliminated or reduced by turning the temperature control to the fully cold position when not in use.
Generally these are good reliable and efficient cartridges compared with others I have experienced.
I hope this helps someone – it would certainly have helped me at the start of my Aqualisa journey!!!


