Bending wood for rocking horse restoration

Joined
11 Feb 2017
Messages
218
Reaction score
1
Country
United Kingdom
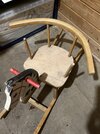
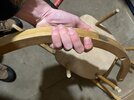
Hi everyone - I’m planning to restore this old rocking horse for my little girl and realising that re-bending this back rail might be trickier than expected. Any tips from anyone would be appreciated. I don’t know what kind of wood it is and haven’t bent wood before. Doing some research, most examples seem to involve steaming plies and building them up - but of course this is quite thick and I can’t afford for it to snap.

I can also see that some don’t steam but soak, but I’ve seen mixed results and no one bending anything this thick.

Thanks so much
 
If you need to bend timber soaking simply doesn't work unless it is thin material which will end up being heavily fixed in place, e.g. curved skirting which gets nailed or screwed to a wall. In order to bend thicker wood the species must be suitable - which means specific hardwoods such as beech as softwood doesn't steam bend. What the steaming does is to plasticise the ligninin the wood allowing it to be bent - providing you have an appropriate steam bending rig which requires a steel strap. And even then you need to deal with spring back (where in order to get a required radius a bending rig of a slightly tighter radius is required) and there is no guarantee that the wood fibres will fail (even in firms which are experts at steam bending, such as Ercol, have a percentage of failures). So unless you are a really keen woodworker and don't mind getting the odd blister or scald (really) it's maybe best left alone.

Lamination, on the other hand is somewhat easier, but still requires tools. You start by building an accurate female form from something like stacked layers of MDF. The face of the form is coated with a release agent, such as wax and a layer of material is wrapped round it and the visible face of the material is liberally coated in glue before another layer is planted on top and thectwo pieces are clamped together. Clamping starts from the middle and extends to the outer ends with a G-clamp or F-clamp every few inches, pulled up tightly. Once the glue has set another layer is added, then another which is left to cure, and then another, and so on. This requires a LOT of clamps and can take a few days (I've made laminated hardwood lippings for curved NHS reception desks this way using 2mm thick rips of oak which were produced on a bandsaw and then surface sanded). Finally, once you have a laminated piece, the ends will need to be trimmed with a mitre saw or the like (the ends will be a bit ropey - so the piece has to be made oversize then trimmed back).

If you are looking for material to laminate with, some veneer merchants carry thick veneer specially for the purpose. Also, for a DIY job, providing a painted finish is acceptable, you might want to consider bendy plywood (although that does require a LOT of glue)
Sounds like a job for an expert.
 
They do teach these techniques at college in both furniture making and furniture manufacturing courses (level 3 and degree level courses, though), but even in commercial areas like shop and bar fitting they aren't much used, either. Whilst all these techniques can be learned by a competent DIY woodworker I'd certainly scratch the steam bending on the dual grounds of high potential failure and personal safety

On the other hand lamination, being a cold technique, is a lot simpler, but it still requires a lot of clamps, or it won't work (you end up with lots of voids in the joints and a weak component). It may be possible though, by careful orientation of the grain and jointing, to make up a strong enough replacement component from solid wood. OP, would you be able to post a picture of the broken component so we could see if this is feasible?
 
Last edited by a moderator:
I’m planning to restore this old rocking horse
A pic might be helpful.
I've seen rocking chairs where the rocker is cut to shape, rather than bent. Is that an option?
Could you use a steel strip to provide the main strength, and add wood for cosmetic effect?
 
If it's for the rockers, glue two timber pieces together that make a width wider than the arc of the rocker and then cut the shape out of it.

If it's for the backrest and restraint sides for very small children, you can make something similar from flat sections or thick dowel, either without the bent corners, or add a cut section of timber to round the corner off.

You need to post an image of what you are trying to achieve
 
A pic might be helpful.
I've seen rocking chairs where the rocker is cut to shape, rather than bent. Is that an option?
Could you use a steel strip to provide the main strength, and add wood for cosmetic effect?

If it's for the rockers, glue two timber pieces together that make a width wider than the arc of the rocker and then cut the shape out of it.

If it's for the backrest and restraint sides for very small children, you can make something similar from flat sections or thick dowel, either without the bent corners, or add a cut section of timber to round the corner off.

You need to post an image of what you are trying to achieve

Thanks for the reply everyone and apologies for just getting back, getting used to life with a newborn! Hmm I did attach the images but obviously something didn’t work. Please find them attached again - it’s the rail for the back support, the rockers themselves are attached and fine but the rail came off at some point and has started to straighten back out
 

Attachments

  • EC8FBD6E-A7DE-42D5-AD18-BA1A267B084E.jpeg
    EC8FBD6E-A7DE-42D5-AD18-BA1A267B084E.jpeg
    409.1 KB · Views: 74
  • D9CB4575-7D4B-4942-9E00-ED93525B5A90.jpeg
    D9CB4575-7D4B-4942-9E00-ED93525B5A90.jpeg
    241.4 KB · Views: 70
Looks like a steam bent beech back rail. Given that you probably won't be able to bend that back, I think your best bet might be to make up a laminated plywood seat back rail. The existing back rail would need to come off and a neat, accurate hardboard or thin plywood template is then made up (jigsaw, block plane, etc). This is used to mark out to the boomerangs (3 or 4 off) on a sheet of 15 or 18mm birch plywood which are they cut out. The reason gor using birch plywood is that it has a greater number of veneers for a given thickness (9 to 13 plies for 18mm is common), minimal voids, better quality glue than far eastern (mistly Chinese) plywood and is far less likely to splinter than the F/E stuff. The boomerangs can be glued and screwed together to make a thicker blank which an then be shaped, sanded, drilled and fitted.

if you have a router (preferably 1/2in) the initial template could be used in conjunction with it and a template trim bit to do most of the cleaning up and shaping work for you

So whilst not bending wood, this is a simpler process than the ones I outlined above. But the main thing is that it needs birch plywood...
 
Last edited by a moderator:
Looks like a steam bent beech back rail. Given that you probably won't be able to bend that back, I think your best bet might be to make up a laminated plywood seat back rail. The existing back rail would need to come off and a neat, accurate hardboard or thin plywood template is then made up (jigsaw, block plane, etc). This is used to mark out to the boomerangs (3 or 4 off) on a sheet of 15 or 18mm birch plywood which are they cut out. The reason gor using birch plywood is that it has a greater number of veneers for a given thickness (9 to 13 plies for 18mm is common), minimal voids, better quality glue than far eastern (mistly Chinese) plywood and is far less likely to splinter than the F/E stuff. The boomerangs can be glued and screwed together to make a thicker blank which an then be shaped, sanded, drilled and fitted.

if you have a router (preferably 1/2in) the initial template could be used in conjunction with it and a template trim bit to do most of the cleaning up and shaping work for you

So whilst not bending wood, this is a simpler process than the ones I outlined above. But the main thing is that it needs birch plywood...

Thanks so much for the detailed reply @JobAndKnock I appreciate it. Although a shame that I can't bend the existing piece it's good to know I can rule it out. One downside of the ply route is having the laminations visible, but if I need to I can. One left field idea is that I have some left over peices of white amiercan oak - about 1inch thick in old money - I could cut out the shape from these and shape/route it to make a more rounded bar. However i unfortunately don't own a bandsaw and reckon a jigsaw on thick oak like that is asking for a bad job. Would you say that's still an avenue worth exploring? (Realise at this stage Im just bouncing ideas, so thanks for humouring me!)
 
One left field idea is that I have some left over peices of white amiercan oak - about 1inch thick in old money - I could cut out the shape from these and shape/route it to make a more rounded bar.

...(I) reckon a jigsaw on thick oak like that is asking for a bad job. Would you say that's still an avenue worth exploring?
Well, whilst you can rough these out with a bandsaw or a jigsaw, you will still need to do the finishing work somehow to get a smooth edge - which really takes a router and a template (as I mentioned above).

The primary difficulty with trying to cut a C-shaped piece of oak is that your oak won't be wide enough to cut it out in a single piece, so that really means cutting it as 3 or 4 pieces and jointing it - screws simply won't hack it. The jointing need to be something like loose tenon joints or multiple dowels (partly to prevent twisting). That in turn requires a mitre saw (to produce the angled end cuts) and some mechanism to produce the mortise slots (ideally a task for a Domino, but the price may be hard to swallow) or a dowel jig

The difficulty with this approach is that there is still the chance of gettingvshort grain areas, which are naturally weak, and any joints are another potential weak point
 
Last edited by a moderator:
Thanks so much @JobAndKnock for the detailed replies and sorry for my late replies. Also, cant believe the price of birch plywood at the moment! If it were up to you, would you go with your bending idea or the stacking idea? I'm torn between both methods, thanks!
 
Personally, the method which I'd find the fastest and which requires the least equipment is the stacking method. It does need a jig saw and a router, though

Lamination, whilst simple, does require a lot of clamps, because you absolutely must get the laminae to glue together tightly.

Bending (as in steam bending) I feel is just too dangerous to contemplate for a first timer. My own experience of steam bending in a workshop is that you invariably end up getting burned or scalded doing it (even if only minor) and that the component failure rate means that doing a one off may be a very expensive way to repair your rocker especially as you will need to make up a heavy enough bending jig and have a steel bending strap welded-up. It is a technique better suited to production runs in s reasonably well equipped workshop IMHO

Thanks so much, that settles it. I've got a jigsaw and router so that's not a problem. I've got some ply here, but its not birch, so will practice on some off cuts I have and then will go get some birch ply (once i remortgage the house haha!) Timber merchant near me does have some thick sheets of pine on offer which may be worth a look if they go big enough, but will have to see them in person
 
Back
Top