Hi all
Please go easy on me, I'm a amateur DIYer at best and only took this on as finding a plasterer to do such a small job has been difficult.
We had a radiator valve leak on an upstairs rad and got to it via the ceiling on the ground floor. Plumber has sorted that now.
After lots of research, I did the following to repair:
- cut plasterboard to size, offered up to ceiling and screwed in to existing joists using coarse thread plasterboard screws, and didn't damage the paper cover thankfully
- PVA'd around the edges
- filled in the larger gaps and PB screws using Toupret interior filler and then PVA'd over the dried filler
- this left about 2-3mm gap for the plaster
- used British Gypsum finishing plaster to do two coats, the first slightly thicker consistency than the second. Did the second coat after the first was firm to touch
- knew I'd never get a perfect finish so was going to sand down before mist-coat and painting
I tried my best to do a nice thin layer each time but given it's my first go, I completely accept it may have gone wrong. Looking to learn why and how to fix it here.


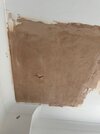
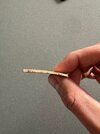
As you can see, the plaster has failed in a few sections by cracking and peeling away. In the second picture you can see the thickness, so slightly more than 1 mm.
Does anyone know what the cause may be? And also how to fix it? I assume take away the failed plaster and maybe use easifill? Then sand and paint as normal?
Please go easy on me, I'm a amateur DIYer at best and only took this on as finding a plasterer to do such a small job has been difficult.
We had a radiator valve leak on an upstairs rad and got to it via the ceiling on the ground floor. Plumber has sorted that now.
After lots of research, I did the following to repair:
- cut plasterboard to size, offered up to ceiling and screwed in to existing joists using coarse thread plasterboard screws, and didn't damage the paper cover thankfully
- PVA'd around the edges
- filled in the larger gaps and PB screws using Toupret interior filler and then PVA'd over the dried filler
- this left about 2-3mm gap for the plaster
- used British Gypsum finishing plaster to do two coats, the first slightly thicker consistency than the second. Did the second coat after the first was firm to touch
- knew I'd never get a perfect finish so was going to sand down before mist-coat and painting
I tried my best to do a nice thin layer each time but given it's my first go, I completely accept it may have gone wrong. Looking to learn why and how to fix it here.


As you can see, the plaster has failed in a few sections by cracking and peeling away. In the second picture you can see the thickness, so slightly more than 1 mm.
Does anyone know what the cause may be? And also how to fix it? I assume take away the failed plaster and maybe use easifill? Then sand and paint as normal?

