Home Brewing

Joined
3 Jun 2007
Messages
852
Reaction score
16
Location
N East
Country
United Kingdom
My favourite draft beer is Camerons Strongarm, followed by John Smiths bitter.

In my younger days I used to undertake home-brewing (there was a local shop that

sold all the necessary “ingredients” etc). With the present lock-down I’m missing

a pint of decent draught ale. Can any-one suggest a kit or the ingredients/recipes

for home-brewing similar beers to the above please.
 
Doesn't it take at least a month to brew beer?

Pubs will be open again by then.....
 
Around 8 years ago my wife started a beer kit, and I took it over, which started me brewing home kits, I find Scottish Export suits my taste best, but home brew drops into two groups, the expensive kit which to be fair with two can kits makes a very good ale, and the cheap kits where you add loads of sugar. So we jump from around £12 to £20 between 1 can and 2 can kits.

So I have done one or two 2 can kits, but in the main idea was cheap beer, and so looking at around 30p per pint to 55p per pint and can buy Morrison Bitter at 52p per pint so as a money saving exercise not worth making 2 can kits, OK Morrison Bitter only 2% and in Wales the price has gone up, but I live close enough to boarder to pick it up in England.

So early days I was trying a different one on regular basis then Morrison's started doing a small range of kits at around £7.50 stopped doing it now, but the result was I started doing same kit again and again, but the flavour was not the same, so my question was why, even when two kits bought together the flavour was not the same when done one after the other.

So careful notes and realised it was the temperature, wife wanted me out of kitchen so moved to garage, which was really too cold so got the old fridge/freezer and a thermostat and started to brew with a very controlled temperature, cutting a long story short, I realised that it was all down to first two days, if it warms up or cools down latter it makes very little difference, but first two days are critical two reasons, one is your not boiling the water, it is out of the tap, so does not matter how clean to keep things, bugs can get in, so you want the alcohol fast as it kills the nasty bugs most of the time anyway. Second is if temperature too high it gets a very bitter after taste.

So in the main you want 19.5°C to 20.5°C for first 2 days, after that it can go to 24°C without a problem, but first two days is the important bit. I tried using the fridge turned off, but fermenting produces heat, so fridge too well insulated unless garage below 10°C. So used the freezer compartment and thermostatic control, now freezer has gone use just an old coat, and thermostatic controlled heat pad, and always start on a cool day.

I also changed my aims, to start with looking for 6% ABV then realised 4% tastes nicer, below 4% ABV not sure how well it will keep, but tend to either over fill the fermenter or go a little short on sugar, the more sugar used the higher the ABV and the more bitter the after taste is, so tend to make 45 pints not 40 pints and a little short on sugar.

I tried the fast kits you get in a box, just add water and the yeast, for beer not very good, however for cider they work very well and your drinking it within a week of making it, you can start drinking it after 3 days (it says 48 hours) the longer you wait the dryer it gets, so don't make it too long before you want to drink it.

I find pop bottles are best for bottling, one at 2 litres per bottle you only need 12 bottles, and so easy to fill them, have 14 ready in case it will not all fit, no messing around putting caps on, and you can feel pressure without opening so if you bottle too early you can release pressure.

For the syphon you need extra head to water as the depression in the pipe pulls out the CO² so you can lose syphon so fermenter on worktop and bottle on the floor, fill from bottom so two bits of pipe with a tap at least bottle hight from end, or the beer with froth up if the pipe does not go to bottom. When I started the pipe was too short.

I found when not using temperature control I had to use a hydrometer, but with temperature control could near enough guarantee fomenting finished after 3 week when last two weeks at 24°C.
 
When i did home brewing years ago i used an electric blanket to heat a 5 gallon drum of Brew.
It seemed to work ok, i found bottling the fermented beer fiddly, i used to leave them in a crate in the kitchen to clear, every time the cooker in the kitchen was being used the heat from it would cause the beer caps to blow off.

If i was going to start home brewing again i would use a corny keg instead off bottles.
Using a keg means you can regulate the gas pressure of the beer better.
 
Last edited:
Home brew... As a rule of thumb the greater the effort put in the better the result. The all in one kits produce average results. But as with many things the sky's really the limit as to how in depth you go. For instance I doubt many home brewers make their own malt.
 
When i did home brewing years ago i used an electric blanket to heat a 5 gallon drum of Brew.
It seemed to work ok, i found bottling the fermented beer fiddly, i used to leave them in a crate in the kitchen to clear, every time the cooker in the kitchen being used the heat from it would cause the beer caps to blow off.

If i was going to start home brewing again i would use a corny keg instead off bottles.
Using a keg means you can regulate the gas pressure of the beer better.

When I did homemade wine, I devoted a 3ft x 3ft x 2ft deep section of my bedroom wardrobe to the fermenting process. I used to be able to get three or four demijohns in there at a time.
Given that fermenting itself gives off heat, I thought that lining the space with 1" polystyrene would keep the fermentation heat in, therefore helping the process along with minimal fuss. It worked a treat (y)
 
I tried it a few times in my youth but couldn’t be arsed waiting so I always drank it waaay too early. :rolleyes:
 
Home brewing has moved on a lot since the days of a home brew kit from Boots.
Some of the kit for Brewing is professional quality.
You can get force filters to clear the fermented beer of yeast particles, so no more cloudy beer or sediment.
No need to prime your bottles with sugar to carbonate the beer.
Once the beer has been filtered into a corny keg, it is just a matter of carbonating it with gas from a cylinder which can be adjusted in order to get a nice foamy head(if required) on your pint.
 
Used to go to an old Malthouse in Wakefield (Fernando's) which sold home brew equipment and the kits.
Used to enjoy the Australian Coopers kits.
Make a batch, into the barrel and a daily couple of pints.
 
I use old plastic pop bottles, if I make an error and bottle too early I can feel the pressure in the bottles and release the pressure, and bottling is so much faster, and drinking I can drink how much I want, if I just want a small glass with a meal, can replace cap and drink rest next day.

I will admit there is a variation in the kits, and the Coopers kits seem to use a yeast which can work hotter, it is a case now of look at weather forecast, I no longer have a brewing fridge, so need it cool for first 3 days, after 3 days it can do what it wants, as long as first 3 days it is between 19°C and 21°C then a good brew, after 3 days does not matter if it goes to 24°C, it is just the first 3 days it must not get too hot.

As to brewing from scratch, yes that is brewing as a hobby, doing the whole job from malting to bottling, but can't see the point in the in between stage, using a kit gives cheap beer, and two can kits give you a better quality to one can kits, and may be adding some thing like orange or sprayed malt can tweak the kit, however to experiment you have to only alter one thing at a time, alter two and you don't know which made it better or worse, so to play with the brew, you must have temperature control, so to play, you need a brewing fridge, if you don't have a brewing fridge, then no point in playing as two variables.

What I fancy having a go at, is brewing the sugar independently from the kit. I bought a liqueur kit called Prohibition, and the idea was to brew the sugar to 21% ABV then add charcoal to remove the bitter taste, and once clear add a flavour, like coffee or orange, it worked well, it was a lot of messing around but the result was like the commercial liqueur. The big point is the bitter taste of brewing sugar was removed with the charcoal. So what if you did the same with beer, brew the kit with half water, then brew the sugar, then add charcoal to sugar brew, allow to clear, then blend the two. Fancy doing a 10% ABV beer. Some day I will give it a go.
 
If you're gonna do it do it right......... Nowadays if you want to do proper home brewing you need something like a Grainfather kit or equivalent (other kits are available).
 
I would agree as a full hobby you start by growing the grain, then harvesting it, then malt it, etc, etc. However I have not got enough space for that, or time, so I have to allow others to do some of the job, be it grow the grain, malt the grain, or make the wort, most need to allow others to do some of the process.

Before the yeast does it's job there is very little tax, after the yeast makes sugars in alcohol then tax is payable, so many people are not interested in the bits before tax is added, only the bits which means you don't pay tax.
 
I do a bit of all-grain brewing occasionally. The goal for me is just to have fun rather than make cheap beer. I buy the milled grain, mash in a converted coolbox, do all my heating on an outdoor gas stove, ferment in plastic bucket or glass carboy, and bottle into glass swing-top bottles. I have a room that I can relatively easily keep at 20c for fermentation, but my next step will eventually be to make a brewing fridge with a heat pad and thermostat.
 
I did have a brew fridge/freezer before moving, the original idea was to just heat the brew, but the old fridge/freezer insulation was too good, and it had to be cooled for first 24 hours of starting a blew, I would start in freezer compartment and complete in fridge, I used a 18 watt demo floor tile in fridge and two 8W CFL in the freezer to raise the temperature, controlled by a MH1210A for fridge (heat or cool controller) and a STC-1000 (heat and cool) for freezer. To day the Inkbird ITC-306A means no need to build a controller.

I used an elastic band to hold sensor to side of fermenter under a sponge. experiment showed less than 0.5°C different measured on outside under a sponge to inside the brew, so not worth the chance of contamination. The fridge/freezer always cooled the freezer compartment first so the fridge was a simple insulated box, first 5 days at 19°C then move to fridge between 5 and 10 days and temperature raised to between 22°C and 24°C higher temperature seems better for conditioning.

I could with kits produce 20 pints a week, and that was more than I could drink, Scottish heavy I found suited my taste buds best, with the odd stout, stout does not need as much care with temperature, Yorkshire bitter was too bitter, when I did not have the brew fridge/freezer then Coopers designed for Australia is better in summer, expect it is the yeast they use.

In a fridge or freezer compartment you need around 8 watt of heating, with just a old jacket to keep warm with air lock out of neck the 18 watt has proved ample. It takes time for the brew to heat circulating inside the fermenter too large of a heater can result in hot spots, although the aquarium heater where the thermostat is built into the tube that does the heating you can get away with a larger heater, remember in an aquarium you have glass sides which do not insulate well, but the plastic fermenter with a coat on works far better at retaining the heat.

In the main brew belts seem to big, the simple STC-1000 does not use mark/space ratios to stop over shoot, in spite of being called an intelligent temperature controller, the two bulb lamp holder I used in freezer compartment in a draw under the fermenter one 8 watt CFL was enough, there was a step in bottom of freezer so had to fit bottom draw to have level base large enough, old frost free freezers are OK but if not frost free the cooling bits get in the way of fermenter, also frost free has internal fan so cools quicker.

It had been my intention to use chest freezer, but wife uses it for frozen food, but the fridge/freezer and moving from freezer to fridge half way gave me the hight to syphon into PEP bottles without moving.

Using a energy meter on the bulbs in freezer heart of winter in an integral garage I found it used around 5 watt to maintain temperature once the brewing had subsided, clearly a shed would be colder than the unheated integral garage, in the beginning I used kitchen, this was OK for first 10 days, but you needed a lot of body warmers or coats to keep the fermenter warm enough in winter once first 10 days had gone, ambient temperature winter night 17°C day 19°C and so average 18°C was a little too cool, could take 35 days to complete, with temperature control stopped used hydrometer as at 21 days always complete. It also stopped any problems when a brew simply stalled.
 
I use one can kits now, but use spray malt instead of sugar, the end product is far superior to using sugar. The other tip I would give for really good results is to let it mature in the bottle for about 10 weeks. Need to be organised and brew well in advance, at any time I will probably have about 100 bottles maturing away.

I have tried plastic pop bottles, but much prefer using tradition glass with a crown top. Don't thing it tastes better but something wrong about beer in a pop bottle, spoils the experience.

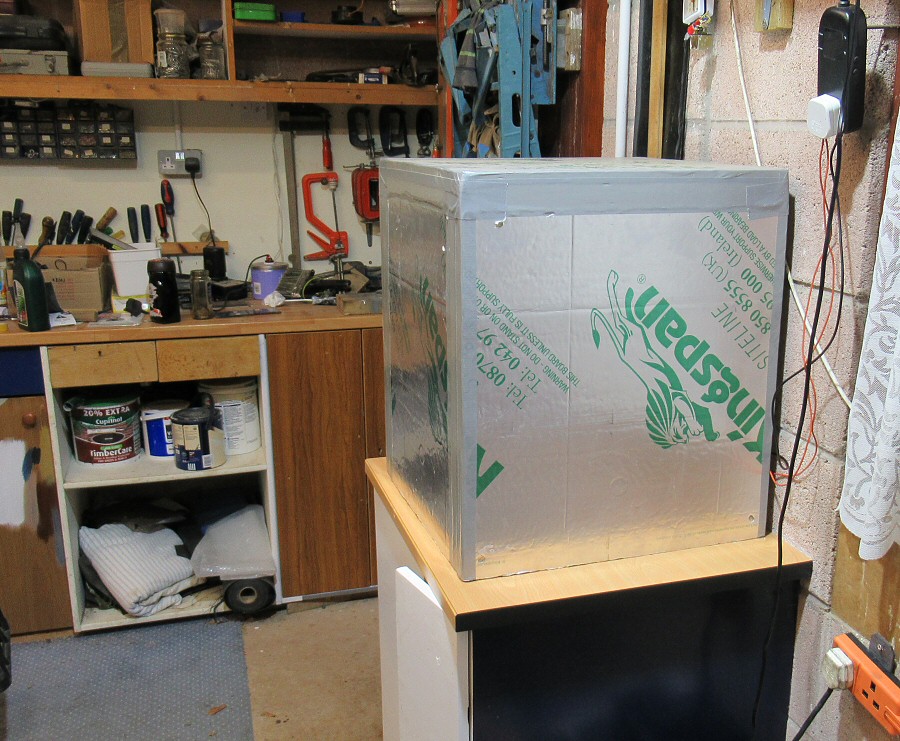
I made a box for the fermenting vessel (fv), and this along with a thermostat controlled heat belt helps to keep a steady temperature, as @ericmark say you need to be careful over the first few days as it self heats. Can be a pain keeping it cool in the summer.
fv-0692.jpg
 
Back
Top