How to create a professional-looking join between a melamine desk and the real-wood strip running around it's edge....

Joined
8 Feb 2015
Messages
229
Reaction score
7
Country
United Kingdom
Hi all

Am building a desk.

Plan on using a thick melamine board for the body of the desk, onto which I'd attach (via glue/nails) a decorative real-wood strip/fascia around it's edge.

I'd like to avoid having a noticeable 'lip' between the board and the fascia, as you'd likely see/feel it as you rest your arms on the edge as you work.

Does anyone have any idea how I could ensure the two are exactly the same level and the join between them is smooth?

Obviously if both were real wood then I'd simply sand the join, but as the main body of the desk is melamine, then I can't sand that bit.

Any advice much appreciated!
 
By "melamine" °I presume you mean melamine faced chipboard (MFC). Laminate trimmer (or trim router as they are often cslled) and a bottom bearing trimming cutter, preferably 12mm or more in diameter as small diameter bits tend to dig in. Lippings should ideally be ripped down so that they are no more than 4 or 5mm wider than the top is thick (so for an 18mm thick top, 22 to 23mm wide). This technique works best with a body grip tool and thin (i.e 6mm or less) lippings - thicker lippings really call for the second technique below

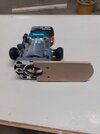
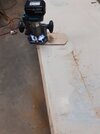
The alternative is to make up a half sub base or offset sub base to replace the standard sub base of a conventional router and use a larger diameter cutter to take the lipping down to within 0.5mm or so of the main surface (NOT flush as that would risk digging in to the surface of the MFC), then finish carefully with a very sharp block plane with the mouth set really fine. I generally use a 16mm or larger diameter cutter when doing this, as in the attached photos. This technique works well with thicker lippings such as the door lipping shown below

20221011_090501a.jpg
20221011_090656.jpg

For the technically inclined the plunge router is a Makita DRT50 cordless laminate trimmer motor mounted in a Katsu plunge base. Any small (i.e 1/4in) router with a fine depth adjuster, as opposed to a plunge, plain depth rod and turret adjustment, would suffice. The sub base was made up from a scrap offcut 8mm MFC - 6/8mm plywood, MDF or similar would suffice The only reason a cordless tool was in use is because I am trade and that was an on-site job making up special tall bifold doors with hardwood lippings
 
Last edited by a moderator:
Thanks so much, this is ideal.

So I could use my 1/4in router with fine depth adjustment and set the depth very carefully (meaning I won't need the sub base?), then finishing with the block plane.

The lipping will be quite thick as I want it to look like a real 'feature'.

And if I understand it right, your second picture shows you routing the lipping in advance of finishing with the block plane?

How did you attach the lipping - glue?

Thanks again, really detailed and very clear info. And yes I mean MFC
 
Last edited:
So I could use my 1/4in router with fine depth adjustment and set the depth very carefully (meaning I won't need the sub base?), then finishing with the block plane.

The lipping will be quite thick as I want it to look like a real 'feature'.
Then you will really need to make up a lipping sub base, as above (20 minutes work). This is because the cutter needs to project below the router base but be slightly above the level of the bottom of the lipping sub base. Look carefully at the photos I posted and it should be possible to figure out why (I hope). If not I'll do an explantory sketch and post that, just ask. The router and trim bit only works up to about 5 or 6mm lipping thickness, because you are running the router on the edge of the material which greatly increases the potential to tip the router and ruin the workpiece. The bigger and heavier the router the more likely it is that you will have at least one tiipping incident. That's why for running along the edges a small, lightweight laminate trimmer Is preferable - but the thickness of the lipping in that case shouldn't exceed 5 or 6mm (ideally 3mm or less) with only a couple of millimetres of overhang.

And if I understand it right, your second picture shows you routing the lipping in advance of finishing with the block plane?
Yes. In that case the door I was lipping was already painted and I stopped the router mid cut. The cutter was set so fine that it removed some of the paint from the door (so maybe 0.2mm or so above thr door surface) but it didn't go through the face veneer (fortunately) requiring only one pass of the block plane and a touch with the sander to finish it ready for the painter

How did you attach the lipping - glue?
Yes. D4 "PVA" (Everbuild D4 wood adhesive). Coated both surfaces, clamped using 2 x 2in CLS for csuls and a clamp every 2 or so. If you don't have enough clamps you canmake some temporary ones up using 2 x.1in PAR softwood and screws. If unsure, just ask again

Thanks again, really detailed and very clear info
Ahhh, the joys of bring OCD and having apprentices!
 
Last edited by a moderator:
Oversizing probably makes it worse because you are trying to run a full size base on a narrow (often 18mm wide) edge. That is part of the reason why laminate trimmers are so small. Oversize baseplates are more commonly used to deal with situations where you need the router to span a large void, e.g. relief carving

There are fundamentally only three ways to trim a lipping or edging with portable tools - use a physically small router running on the edge of the
material with either a bottom bearing guided trim cutter or a straight cutter and a follow bearing arm assembly (generally only useful for thinner edgings/lippings), use a conventional router with a straight cutter and an offset sub base (as above), or buy s specialist edge lippingbtool such as the Festool MKF700 which are designed to run with a horizontal plate and motor (and which are an expensive limited option)
 
Or, for the less technically inclined, glue the wood veneer edge as straight as possible to the top edge by using a block of wood flat on the melanine face.
Once dry, use a sanding block at 45 degree angle making sure you sand the wood veneer and not the melanine.
Gentle strokes with fine sandpaper and take your time.
 
Then you will really need to make up a lipping sub base, as above (20 minutes work). This is because the cutter needs to project below the router base but be slightly above the level of the bottom of the lipping sub base. Look carefully at the photos I posted and it should be possible to figure out why (I hope). If not I'll do an explantory sketch and post that, just ask. The router and trim bit only works up to about 5 or 6mm lipping thickness, because you are running the router on the edge of the material which greatly increases the potential to tip the router and ruin the workpiece. The bigger and heavier the router the more likely it is that you will have at least one tiipping incident. That's why for running along the edges a small, lightweight laminate trimmer Is preferable - but the thickness of the lipping in that case shouldn't exceed 5 or 6mm (ideally 3mm or less) with only a couple of millimetres of overhang.


Yes. In that case the door I was lipping was already painted and I stopped the router mid cut. The cutter was set so fine that it removed some of the paint from the door (so maybe 0.2mm or so above thr door surface) but it didn't go through the face veneer (fortunately) requiring only one pass of the block plane and a touch with the sander to finish it ready for the painter


Yes. D4 "PVA" (Everbuild D4 wood adhesive). Coated both surfaces, clamped using 2 x 2in CLS for csuls and a clamp every 2 or so. If you don't have enough clamps you canmake some temporary ones up using 2 x.1in PAR softwood and screws. If unsure, just ask again


Ahhh, the joys of bring OCD and having apprentices!

Yes I understand now, thank you. The lipping sub base is there to reduce the likelihood of the router tipping into the wood as you manoeuvre it delicately along the edge, because there's more of it on the body of the door/desk, which allows more stability.

Thanks again, this is ideal!

I'm now also considering making it out of walnut and having a brass inlay running around the top of the desk! Oh the agony of choice
 
Last edited:
Back
Top