Hello everyone,
I have recently bought and attempted to install a tado smart heating system to our flat and I've run into an issue. Having searched Google, I found this thread on this forum with a similar question. I didn't want to re-open it after two year so I am creating a new post in the hope someone may be able to assist.
All three tado devices (bridge, wireless receiver, and wireless temperature sensor) are paired and connected with one another successfully and showing in the app. However, when I request central hearing (25 degrees) from the app or temperature sensor, it does not activate the boiler/heating. The CH light comes on and I can hear a 'click' (relay) on the tado wireless receiver when I demand, and turns off when I turn heating off so I'm confident the tado wireless receiver is receiving the instruction, it's just not sending that instruction to the boiler.
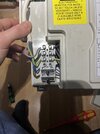
Existing (inherited) setup:


In the spirit of including every detail – however irrelevant it may be – there is a fused switch that turns the boiler on and off adjacent to the old Drayton LP711 now tado wireless receiver.

At the start of installation, I followed the in-app instructions to install the tado replacing the Drayton Lifestyle LP711. However, as mentioned above, when I increase the temperature on tado, the heating does not turn on.
From what I've read and been advised so far, I understand I need to connect L from boiler/junction box to CH COM on the tado wireless receiver; is this correct, or does anyone have any other recommendations?
Thanks in advance.
I have recently bought and attempted to install a tado smart heating system to our flat and I've run into an issue. Having searched Google, I found this thread on this forum with a similar question. I didn't want to re-open it after two year so I am creating a new post in the hope someone may be able to assist.
All three tado devices (bridge, wireless receiver, and wireless temperature sensor) are paired and connected with one another successfully and showing in the app. However, when I request central hearing (25 degrees) from the app or temperature sensor, it does not activate the boiler/heating. The CH light comes on and I can hear a 'click' (relay) on the tado wireless receiver when I demand, and turns off when I turn heating off so I'm confident the tado wireless receiver is receiving the instruction, it's just not sending that instruction to the boiler.
Existing (inherited) setup:
In the spirit of including every detail – however irrelevant it may be – there is a fused switch that turns the boiler on and off adjacent to the old Drayton LP711 now tado wireless receiver.
At the start of installation, I followed the in-app instructions to install the tado replacing the Drayton Lifestyle LP711. However, as mentioned above, when I increase the temperature on tado, the heating does not turn on.
From what I've read and been advised so far, I understand I need to connect L from boiler/junction box to CH COM on the tado wireless receiver; is this correct, or does anyone have any other recommendations?
Thanks in advance.


