You are using an out of date browser. It may not display this or other websites correctly.
You should upgrade or use an alternative browser.
You should upgrade or use an alternative browser.
Removing paint from lintels and sills
- Thread starter Craig24
- Start date
- Joined
- 24 Oct 2020
- Messages
- 2,836
- Reaction score
- 960
- Country


I would advise against going down that path. On the balance of probability you will find areas that have previously been damage and filled. A few years ago, in west London where I work, there was a trend to go back to the original sandstone. V expensive and they looked great for the first couple of years, but in time the sandstone discoloured at a different rate to the epoxy fillers.
Perhaps repaint using a colour similar to the original sandstone.
Perhaps repaint using a colour similar to the original sandstone.
I'm a historic building conservator and I second the Peelaway or StripAway option for removal. Both are a relatively low chemical option and easier to clean up/dispose of correctly. My suggestion is always to consider what repointing you are likely to have to carry out after stripping and also any stone fills you might need to make good in areas of loss. I'd strongly advise avoiding a resin or cement-based filler or mortar. Remember to consider the original stone and it's own tensile strength. If you use a filler that is harder than the stone it will result in the stone washing away or degrading beneath and around the fills. I recommend using a natural lime binder with a stone dust of the same origin. Consult with the folks over at Rose of Jericho for the best advice on materials and formulations, I can't recommend them more! Best of luck and let us know how you get on. I'm thinking of doing it to our house myself #busmansholiday
I'm a historic building conservator and I second the Peelaway or StripAway option for removal. Both are a relatively low chemical option and easier to clean up/dispose of correctly. My suggestion is always to consider what repointing you are likely to have to carry out after stripping and also any stone fills you might need to make good in areas of loss. I'd strongly advise avoiding a resin or cement-based filler or mortar. Remember to consider the original stone and it's own tensile strength. If you use a filler that is harder than the stone it will result in the stone washing away or degrading beneath and around the fills. I recommend using a natural lime binder with a stone dust of the same origin. Consult with the folks over at Rose of Jericho for the best advice on materials and formulations, I can't recommend them more! Best of luck and let us know how you get on. I'm thinking of doing it to our house myself #busmansholiday
Thanks for the advice.
Good to get your thoughts on this DZEnt.I'm a historic building conservator and I second the Peelaway or StripAway option for removal. Both are a relatively low chemical option and easier to clean up/dispose of correctly. My suggestion is always to consider what repointing you are likely to have to carry out after stripping and also any stone fills you might need to make good in areas of loss. I'd strongly advise avoiding a resin or cement-based filler or mortar. Remember to consider the original stone and it's own tensile strength. If you use a filler that is harder than the stone it will result in the stone washing away or degrading beneath and around the fills. I recommend using a natural lime binder with a stone dust of the same origin. Consult with the folks over at Rose of Jericho for the best advice on materials and formulations, I can't recommend them more! Best of luck and let us know how you get on. I'm thinking of doing it to our house myself #busmansholiday
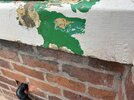
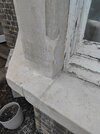
I have just stripped our buff limestone bay window. It was it pretty poor condition with peeling latex paint. Water had got behind the paint causing blistering of the stone in several places.
In lots of places I could scrape the paint off with blunt putty knife. I then used a heat gun to soften the paint that was still adherant and it came off seemingly without any damage to the stone underneath. It's too late for me now but would you caution against this?
I'm starting to wet sand the stone down (40 grit silicon carbide, reasonably gently) to remove the last bits of residue and superficial discolouration, but might need to use some sort of wash to remove the lichen in any pits. This also allows me to ensure good slope to the sills and reopen/recut the drip grooves.
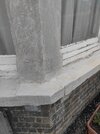
In terms of repairing defects, I've bought some of the St One stone repair mortar from Ty Mawr, who colour matched to a stone sample I sent. I did a patch test and it looks decently strong. I believe it's a lime-aggregate blend. I think it looks decent- see the photos with repairs to the two chamfers. This was my first test. Shaping is quite easy and I'll improve on those results I think.
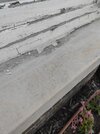
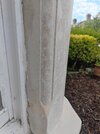
I'm having trouble with the colour match however. It's perfect for the core of the stone (they snapped the sample I sent and matched to this. However when I start to sand the stone, it has a reddish/brown colouration to it. I wonder if this is old pollution, some transfer from previous paint, or a characteristic of the stone itself? The few houses on our street which have never been painted are a sooty buff colour without that red/brown tinge. I initially thought it was sandpaper discolouration but that remained the same after switching to black sandpaper. The sills don't seem to have the discolouration in the same way as the verticals do.
Photos attached
So my key questions are:
-is a heat gun a mistake (for others mainly)
-how would the stone have been cut & finished originally- sanded or not
-is the reddish discolouration a characteristic of the stone on sanding, or will it go away if I sand aggresively?
-if I chose to repaint (to blend any colour mismatch), can I do this with some sort of limewash to approach the buff colour of the stone, and would this avoid the water damage the latex paint caused in the first place? Or would a masonry paint be better?
Attachments
Last edited:
This makes good sense to me but the only caution I'd have is that where I've seen over painting of peeling stone surfaces it never gets a great finish. So if you can strip down to stone +/- filler that would be a better basis for new paint.I would advise against going down that path. On the balance of probability you will find areas that have previously been damage and filled. A few years ago, in west London where I work, there was a trend to go back to the original sandstone. V expensive and they looked great for the first couple of years, but in time the sandstone discoloured at a different rate to the epoxy fillers.
Perhaps repaint using a colour similar to the original sandstone.
Short extract from my long message above to answer the OP's question- I found a heat gun & wet sanding worked brilliantly for paint removal, even the nooks and crannies. Did a bay window in 2 evenings, costing £40 for the heat gun and sandpaper. Perhaps someone can advise if that's damaging to the stone but I've seen no immediate evidence of that.
I've also just come across this from another thread- a stone effect paint which may be a solution to recreate a stone effect if the underlying stone and fillers aren't of a quality to leave bare https://www.charlesproducts.co.uk/windowsills.htm
Apropos the reddish colour, I have come across something similar when repainting customers window sills/etc. I suspect that the victorians used some kind of coating over the "stone" to flatten it. In my experience, once I sand through that I am presented with a fragile substrate that rips quite easily. Unfortunately, sometimes I have to deal with sills that have substantial cracks that require me to grind away a few mm. When that happens I seal the loose material with SBR and then fill with either 2 pack filler or Toupret Murex.

